
How to Pipe Perfect Icing

I have taught dozens of cookie decorating classes. Even before teaching strangers, I was teaching my friends how to decorate cookies. And from all of those experiences, there is one thing I see people struggle with most. And, not to mention, something that I struggled with for a long time.
How to pipe perfect icing.
What do I mean by that?
A perfectly iced cookie is one with a flat, even layer of icing that perfectly covers every single inch of the surface of the cookie. If you go to a bakery where they sell decorated cookies, follow cookie decorators on Instagram, or pin decorated cookies on Pinterest, then you are probably familiar with what I am talking about.
Actually, in order to describe what I mean, maybe it's best to show you what a perfectly iced cookie IS NOT.


The three images above all demonstrate that lumpy, bumpy, uneven icing that I am referring to. The bumps are pretty obvious in the pumpkin cookies.
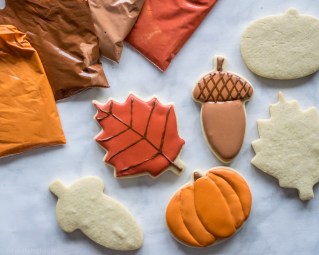
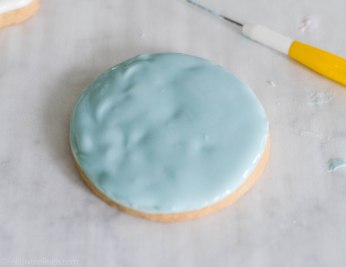
And these three cookies demonstrate that flat, even, and thick layer of icing that now comes naturally thanks to my four tips below.
How to Pipe Perfect Icing

Tip No. One:
Outline your entire cookie with either piping consistency icing or flood consistency icing.
THEN WAIT!
Yes, waiting is trick numero uno. You want your outline to harden slightly before filling it with the cookie (you only need to wait about 1 minute for piping consistency icing and 2-3 minutes for flood consistency icing). This creates a barrier for your fill icing so that you don't have to worry as much about over filling and icing dripping down the sides. Also, by filling with more icing, you are ensuring that you have a perfectly flat surface.

Tip No. Two:
Fill the outline you have just created with flood consistency icing so that almost no cookie is showing underneath.
As you will know from my Royal Icing post, flood consistency icing is icing that flows back into itself in about 10 to 15 seconds after running a knife over the surface. To achieve a perfectly flat surface, I tend towards 10 seconds.
10-second icing will be so fluid that the icing will just start to run together and fill the entire surface area you created with your outline without you even having to touch it.
Which leads me to tip number three...

Tip No. Three:
Touch the icing sparingly.
When you watch my videos, you will see me use a scribe tool (that yellow thing in the top right corner) to move the icing around to help fill the outline. I try to do this as little and as quickly as possible.
If you have done trick number two correctly, you will need to do very little work at this point. The icing should be almost completely covering the cookie with little help from you.
You may wonder why this is such a problem. Well, let me tell you!
The icing starts to dry immediately when it's exposed to the air. After about a minute, the icing will start to develop a skin. If you continue to move the icing around after this point, it will no longer flow back into an even surface. You will start to get drag marks and bumps. Definitely not the look you are going for.

Tip No. Four:
Pop the bubbles.
Inevitably, the icing will have a few air bubbles in it. Tapping or shaking the cookie will expose the bubbles on the surface. Use a sharp object to pop them, otherwise, they will look like blemishes on the top of your cookie once the icing has dried.
Not cute.
What Not to Do
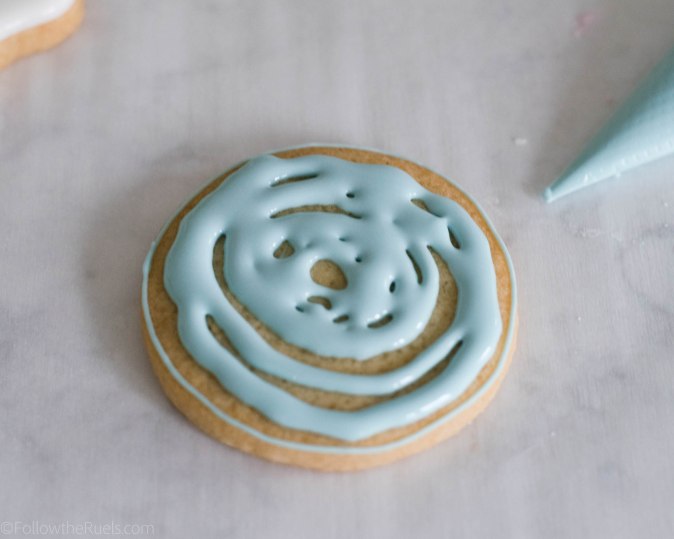
Most of the tricks are pretty easy to understand. But it's trick number two that holds people up. No matter how many times I tell people, "fill the cookie so that no cookie is showing underneath", they tend to under-fill the cookie which results in a lumpy bumpy mess.
What happened in the cookie above is that 1) I didn't add enough icing. Because of that, 2) I spent too much time messing with the icing to fill in the outline.
In the last picture, you can see the drag marks that I made in the cookie just trying to move the icing towards the edge.
Okay, I also have one other "what not to do" and that is to not use a knife or spatula to fill the cookie. This is not a technique that I use and I don't want to use someone else's picture and call them out, so you will just have to picture it yourself.
What I have seen some cookie decorators do is outline their entire cookie like in trick number one, above. Then they pour/spread the flood icing with an offset spatula. Sure, it's fast and easy. And it may even work if you just have one large area like a circle, square, etc. But once you start adding in other smaller areas (the pumpkins are a good example), you are asking for trouble. The spatula spreads the icing too thin that you will see every single imperfection in the cookie as well as any others created by the icing.
Pros and Cons

There are some pros and cons to this technique.
I think the pros are pretty obvious:
- A flat, even surface
- No lumps, bumps, or bubbles
- It is faster because you can employ the assembly line method (outline all cookies, then fill all cookies)
- A thicker layer of icing
However, the cons may not be quite so obvious:
- It's not the best for beginners. This is because you can't adjust the outline after you fill cookie. This is one of the main reasons I didn't use this technique earlier, and why I don't teach it to new students. If you are not used to piping royal icing, it may be very hard to pipe right on the edge of the cookie. By outlining and then filling right away, you can make corrections and adjustments to your outline if you don't like it.
- You can see the outline. If you look at the second set of photos, you can actually see the outline of the cookie. Because the outline is either a different consistency or already dried icing, the fill icing won't totally blend in. If this is something that bothers you, then this technique may not be for you.
Summary
Well, that was lots of information for a fairly simple subject. I tend to do that sometimes. So in case you glossed over most of the content and just want the summary version, here are the highlights:
- Outline the cookie and let it dry for 1-2 minutes.
- Fill the cookie so that you can see almost no cookie underneath. Don't underfill!
- Spend less than 30 seconds spread the icing around.
- Pop any bubbles on the surface.
- Don't use a spatula to spread icing onto the cookie.
I can almost guarantee that these tips and tricks will help you pipe perfect icing. I have seen such an improvement in my own cookies because of them. Since I was pretty much self-taught, they took me a couple years to master, but now I am sharing them with you so you don't have to waste your time!