
The Perfect Christmas Cookies
I'm sharing everything you need to know to make the perfect Christmas cookies!
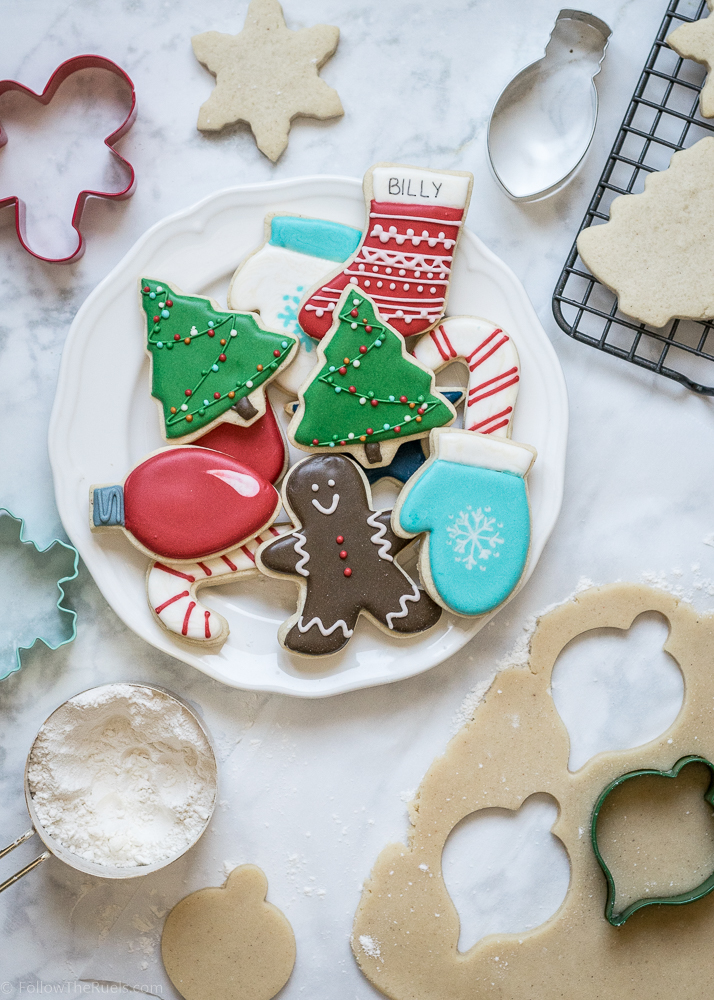
By now it's probably clear that I like to make cookies. They are my go to treat whenever I have to bring something to a party, especially during the holidays. In the last couple years, I have dedicated more and more time to not just baking cookies but decorating them, too! I even teach classes on cookie decorating through a local Charlotte company, SkillPop. Not only is it fun for me to make them, I get love giving them to other people, knowing that they will be enjoyed!
It's also clear to me that I am not alone in this. I see a MAJOR uptick in traffic to my cookie and icing recipes this time of year. And because I get so many questions about cookie decorating, I thought I would write down all my tips and tricks for you guys so you can not only make the perfect Christmas cookies, but awesome cookies year round!
Be prepared, I have basically written a novel on cookie decorating. I have broken it down into the basics: the dough, the icing: and the decorating. I have linked to a lot of my recipes and other products that I use and recommend to make your cookie decorating experience a bit easier. Know that my recipes and products are not necessary for delicious and beautiful cookies. But they will help.
The Dough

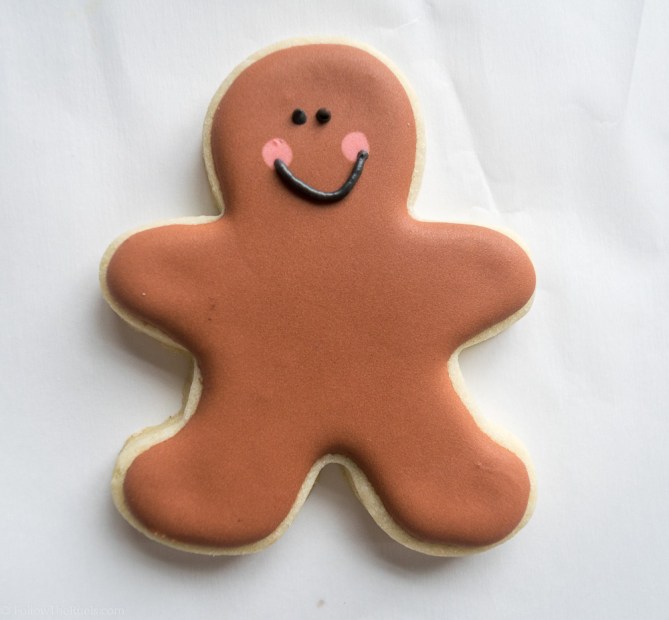
The dough is the foundation for the perfect Christmas cookie. For just about all my cookies I use my all time favorite sugar cookie recipe. The reason I love this recipe so much is that the cookies hold their shape perfectly, which means whatever they looked like when you cut them out is pretty much how they will look when they come out of the oven. That is key for decorating cookies, because then you have a better guide for outlining your cookie - you aren't trying to guess what the original shape was.
I get a lot of compliments on these this cookie recipe. While they aren't super soft cookies, they aren't crispy either. I try not to over bake them - taking them out of the oven at the first signs of browning - which ensures that they stay nice and tender.
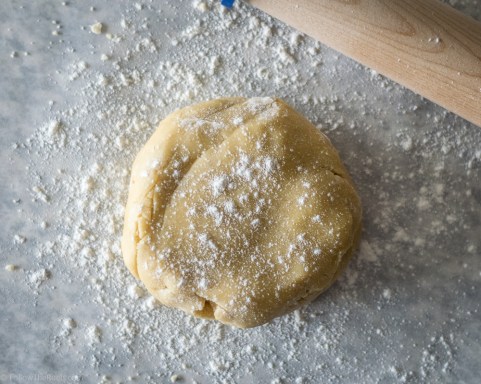
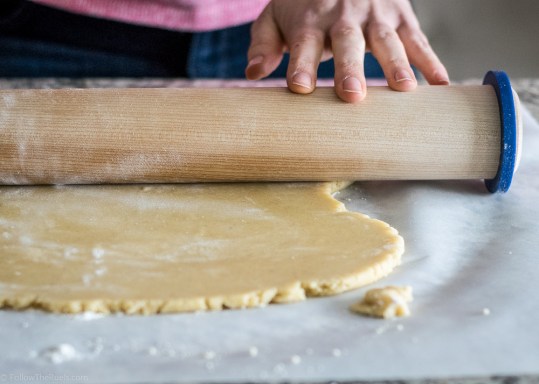
To make sure I have evenly shaped cookies every time I use a nice big rolling pin (I recently bought this rolling pin and absolutely LOVE it) and these rolling pin bands. I absolutely swear these bands and tell all my friends (and cookie decorating students) to get them. They ensure that the dough rolled out to a consistent thickness so that each cookie is exactly the same. And in case you are wondering, I use the largest (blue) band to roll out my cookies.

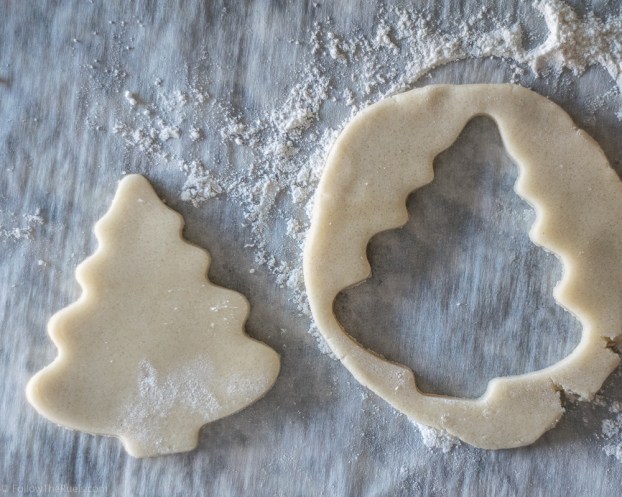
I also prefer to use the coated metal cookie cutters (like these, these, and this gift set that I bought mainly for the cookie spatula) because they are easier to clean and don't rust. But I have cookie cutters of all types in my collection and tend to use whatever has the best shape. A tip to ensure that the cookie cutters don't stick to the dough and potentially warp the cookie shape is to dip it in a pile of flour first, then cut out the dough.
I also like to roll out my dough on a sheet of parchment paper. This helps me use less flour so that the dough doesn't stick to the counter tops and makes it a lot easier to lift off the cut out cookie.
Why you shouldn't use store bought dough
A lot of people ask me if they can just use store bought dough. The answer is, of course you can - you can use whatever sugar cookie recipe you like best. HOWEVER, your cookies aren't going to come out the same. Store bought dough and cookie mixes (as well as some other recipes) contain leavening agents (baking soda, baking powder, etc) in it which make the cookies softer, but they will also lose their shape when baked. See the example below.

I rolled out a very popular brand of sugar cookie dough the exact same way I cut out the cookies in the first picture in this post (the exact same thickness). Once the cookie came out of the oven, it was almost unrecognizable.
I know making your own dough can be a lot of work, but I promise you, it is worth it! I tend to make big batches of it and store it in the freezer (wrapped in plastic wrap and then bagged in a zip top freezer bag) this time of the year because I know I will go through lots of it.
Make the dough your own

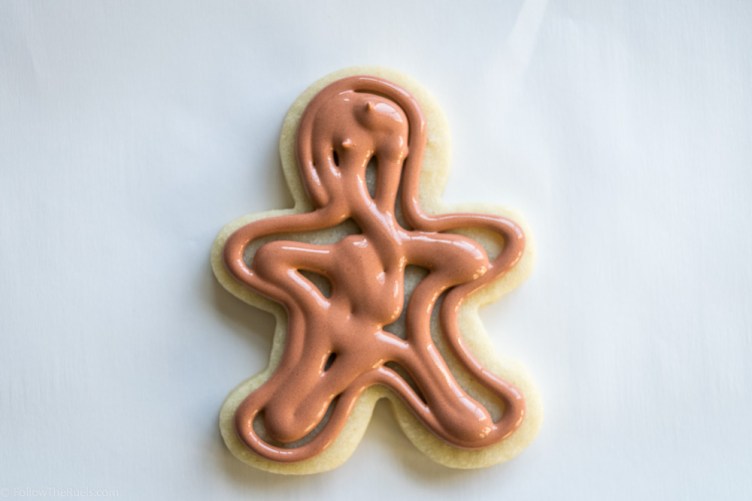
Another added plus to making your own dough is that you can make it whatever flavor (and color) you like by adding various spices and flavorings. During the holidays, I love to add cinnamon and nutmeg to my cookies for that nice holiday spice flavor, or even make chocolate sugar cookies like you see above.
This year I developed 12 new sugar cookie recipes perfect for Christmas, which I published in my Christmas Cookie Guide.
Making Cookies in Advance
During the holidays, we tend to make LOTS of cookies. Which means, if you are trying to do it all in one day, you will be working for hours! Fortunately, you can make the dough and even bake the cookies well in advance. Here's what I do:
If I am just making the dough in advance, I wrap it up in plastic wrap and then store in a freezer zip top bag and keep it in the freezer until I am ready to cut out the cookies. I just let the dough sit out on the counter for a couple hours to thaw before rolling it out. The dough will keep in the freezer for a month.
If I am baking the cookies in advance, I will roll out the dough and bake as normal. Then, once they are cooled, I will stack them in a freezer zip-top bag (sometimes 2) and then store them in the freezer until I need them. The cookies will last in the freezer for a couple weeks, if not longer. I like to double bag them if I think they will be in there a while.
The Icing

Okay, so the sugar cookies are probably the part that most of you guys have down. You all have made cookies before so you are pretty much pros! It's the icing that may be new to you.
I have shared my recipe for my favorite royal icing previously. The main difference between royal icing and your normal icing is the meringue powder (which can also be purchased at your local craft store). It is essentially processed egg whites and when added to powdered sugar and water, it makes the perfect icing for cookie decorating. I forms a nice flat surface on the cookie that hardens perfectly so that the cookies can be stacked and packaged without causing any damage. It can also be made thicker to make more detailed designs, like dots, letters, stripes, flowers, etc.
To color my icing, I prefer to use gel food coloring (here is my favorite brand) because it is super pigmented and won't water down the icing as much. But no matter what, remember: a little goes a long way! Don't go overboard with this stuff!
There are two types of icing that I use most often: flood consistency and piping consistency. They are the exact same recipe I linked above, but one uses less water than the other. One other distinction about them is that flood consistency icing takes a few hours to dry completely. Sometimes I like to let them sit overnight. The piping consistency icing will only take about 30 minutes to an hour. Just keep them in mind as you start packing up all your pretty cookies.
Flood Consistency Icing
The perfect flood consistency icing is icing that settles back into a flat surface within 10 to 15 seconds after you drag a spoon or toothpick across the surface. I use flood consistency icing about 90% of the time. It is what I use to outline and fill (or flood) all my cookies. It is thick enough that it won't fall over the edges of the cookies, but thin enough that it creates a nice even surface.
To get it to just the right consistency, I add a little water at a time using a spray bottle (if I am working in small batches) or a teaspoon (if I am working in big batches). I add enough water until it starts to feel like its getting a little bit runny. Then I start counting. Yes, I still have to count to 15 every time I make icing so I am sure it's perfect!
Piping Consistency Icing
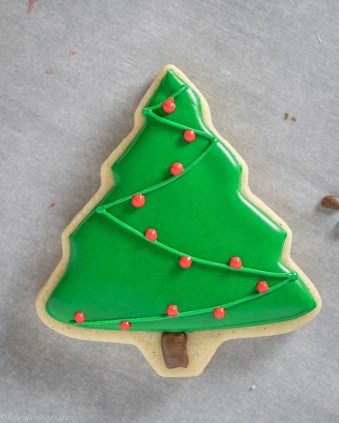
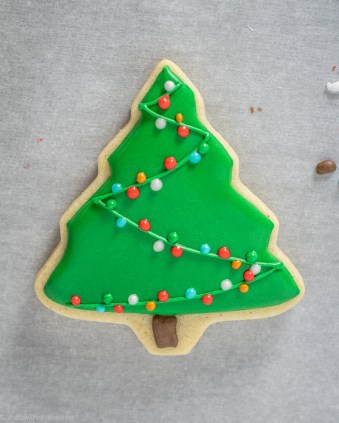
Piping consistency icing is a bit thicker that flood consistency icing. It is what I use to add detail to a cookie. Typically I add detail once the first layer of icing has dried enough that I can pipe right on top. I don't have an exact formula for piping consistency icing, and sometimes I want it thicker or thinner depending on what I am using it for. Generally, it will fall off the back of a spoon into a soft peak or mound, but not settle into a flat surface. In the cookie above, I used piping consistency icing to make the string of lights. I also use it to write letters, make borders, or other precise details.
I also have this handy video of the process I use to make the icing the right consistency. You can see how thick it is when it's piping consistency (I actually ended up thinning it down even more than what's in the video, but it's pretty close), and how thin it is when it's flood consistency.
Making Icing in Advance
Just like with the cookies, you can make the icing in advance, too. However, not at far in advance. If possible, I like to make my icing the same day I am using it. However, for big projects, that may not easy to do.
If you want to make the icing days (or even weeks) in advance, I recommend that you make the icing but DO NOT thin it down at all. Spoon the icing in an air tight container than cover the icing with plastic wrap. The plastic wrap should be touching the icing so that no air is between the plastic wrap and the icing. Then cover it with a lid and place in the fridge or freezer. You will have to let this come to room temperature before you thin it down or use it. (adsbygoogle = window.adsbygoogle || []).push({});
If you want to make the icing just 1 day in advance, you could thin down a big batch of icing to flood consistency and store in a bowl or container the same way I described above. Then, when you are ready to decorate, just give the icing a stir and color as normal. Flood consistency icing does not keep very well because the water will start to separate from the rest of the icing.
Decorating
Now we have our cookies and our icing, so the fun can begin!
Outlining and Flooding
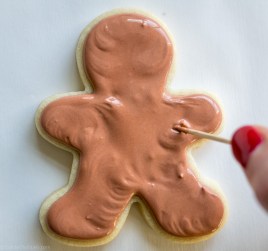
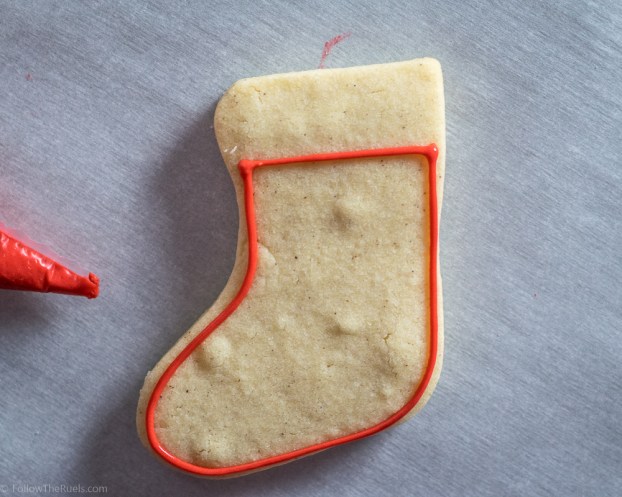
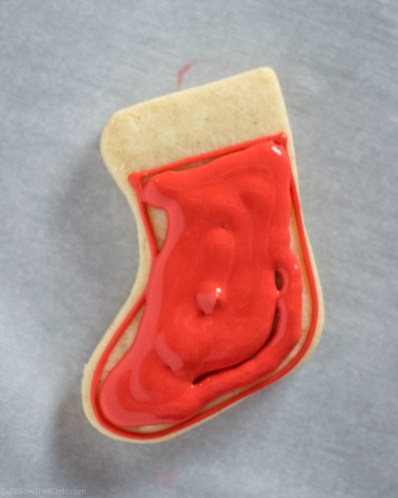
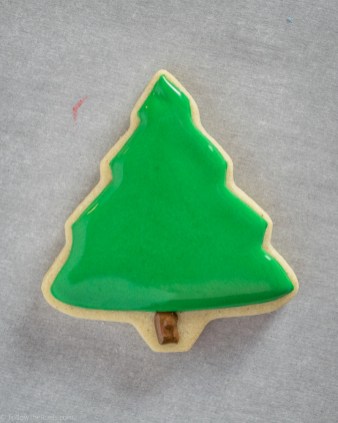
The first step in most of my cookies is outlining and filling the cookies. I start by outlining the cookie as close to the edge as I am comfortable, then filling in the outline with the same flood consistency icing. I like to fill in the outline so that there is almost no cookie showing underneath. Then I use a toothpick, or scribe tool, to move the icing around in circular motions to get an even layer of icing.
Here's a tip I tell everyone, when you are piping your icing, lift the tip of the piping bag up and just let the icing fall onto the cookie. Don't drag the icing across the surface (you can watch me here). You won't get a nice straight line if you do it that way.
Wet on Wet Piping

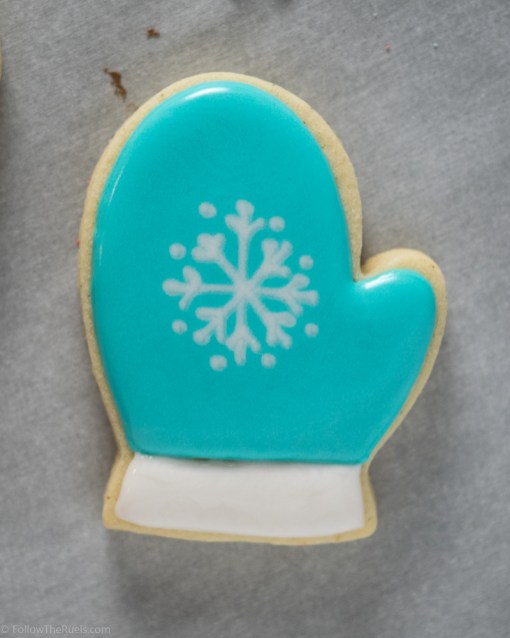
One of the techniques I use a lot is called the "wet on wet" techniques. That is when I pipe wet icing directly onto the icing I just piped. By doing so, the "fresh" icing settles into the first layer of icing. For instance, in the picture above, I piped the white snowflake immediately onto the blue icing so that it completely blended into the first layer creating a cohesive surface.
When you pipe wet icing onto wet icing, it also gives you some freedom to manipulate it a little to get just the right shape. In the picture of the Christmas light cookie, I piped an oval of white icing onto the red, then used my toothpick to drag one edge out to create that tear drop shape.
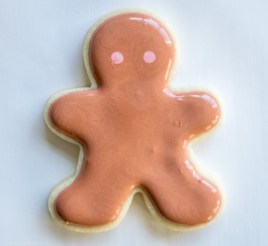
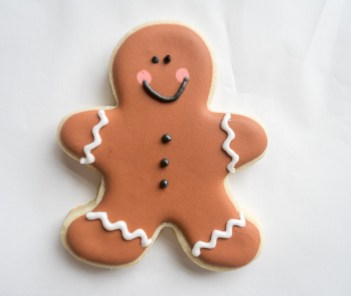
I also use this technique to make polka dots (like the cheeks of the gingerbread men, above), stripes, scallops, etc.
Adding Details

The cookies really start to come together for me when I add the little details. This almost always done using piping consistency icing, described above, because it creates sharp lines, dots, or other texture.
To add the details, I wait for the first layer of icing to crust over. Usually this takes about an hour. If I am adding lots of detail I will sometimes wait overnight so that I don't mess up the first layer of icing. Then I just pipe my designs right on top.
Marbling Technique
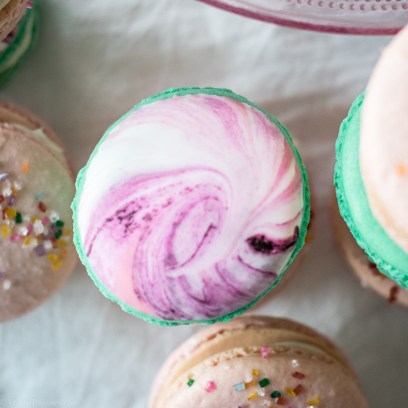
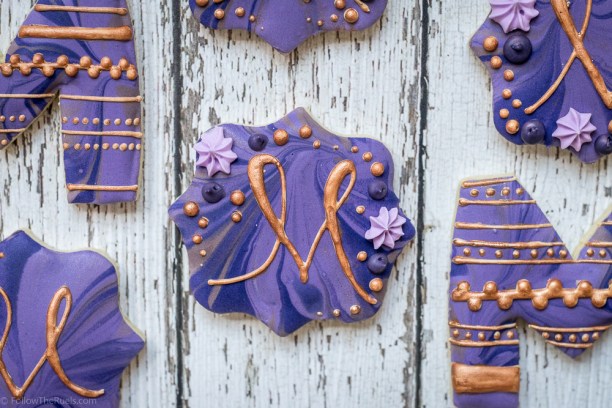
I love sharing this technique with people because its looks awesome on the cookie but its actually really easy to pull off. You can see in the purple cookies above, that there is this really pretty swirl effect going on behind the gold 'M'. It probably looks like it took a lot of time and effort to pull off. Nope, not at all. In fact, it was probably easier than outlining and flooding the cookies.
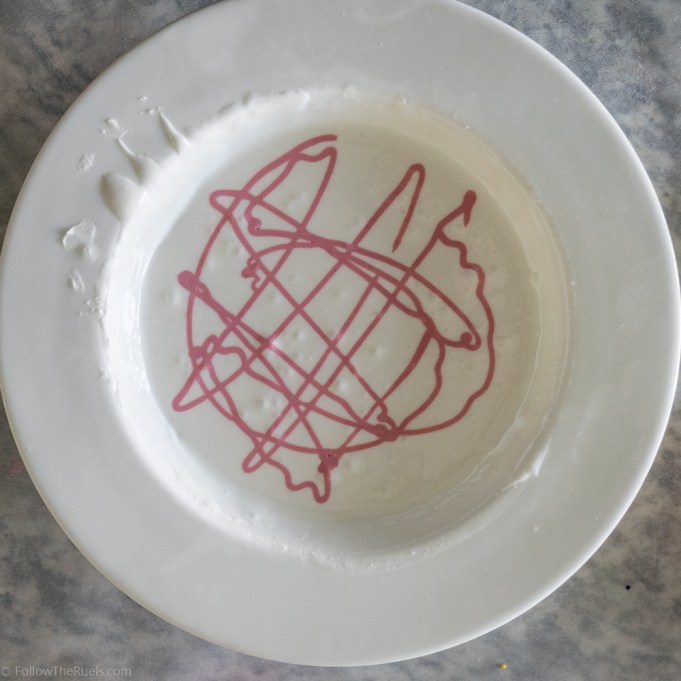
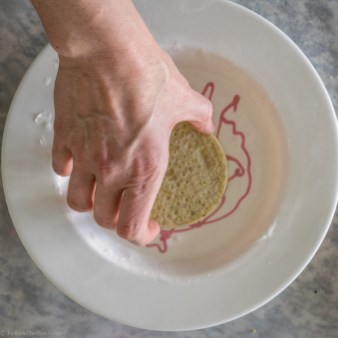
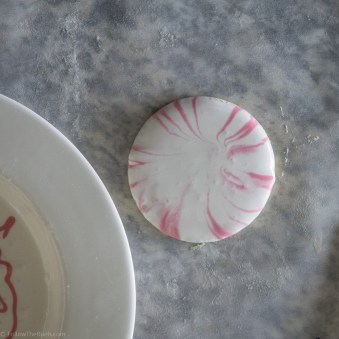
I start with a bowl of flood consistency icing, then I pipe on contrasting color (or 2 or 3) in a haphazard design. Then I dip my cookie onto the surface and lift straight up, letting all the excess icing drip off. I sometimes twist the cookie a bit to make more of a swirled pattern. Then I just set my cookie out to dry. If there are any air bubbles, I will tap the cookie on the surface to get them to pop.
Easy right? I think these would look really pretty with a mixture of reds and greens for the holidays. Or you can just do red and white to make them look like peppermint!
My preferred supplies
You don't need anything special for cookie decorating. In fact, most of the time I use plain old zip top bags. Like the cheap, generic brand zip top bags. Every once and a while, if I feel extra fancy I use piping bags (like these or these), which really aren't fancy at all. If I want to make sure I have perfect lines, dots, or other decorations (like leaves or roses), I use a piping tip. I bought this case years ago, but I tend to use my Wilton #2 and #3 most often.
So there you have it, pretty much everything I know about decorating cookies. I hope this will help you create your own masterpieces this holiday season!

P.S. In an effort to be fully transparent, some of the links used in this post are affiliate links, which means that if you were to purchase one of the products I listed, I will receive a very small commission. All proceeds from this post will be used to make more cookies.